

Your guide to getting started with Hike & Fly
Hike & Fly is just one of the many ways to enjoy paraglider. Hike the trails, enjoy the peace and quiet of nature and be rewarded with a contemplative flight - this is the program that attracts many pilots.
In the past, flight hike required a great deal of experience to be practised safely, but technical developments in equipment and the democratization of the practice mean that Hike & Fly is accessible to pilots skiers at an increasingly early stage in their progression. That's why we'd like to take you on a tour of the various tips, tools and tricks you need to adopt the right reflexes as early as possible.
Preparation and Planning
As with hiking, skiing, rock-climbing or any other outdoor sport, flight hike is not an option without prior planning. Preparing your route map and analyzing the conditions with Caution are the first reflexes you need to adopt if you want to practice your sport safely and serenely.
There are many tools available to help you do this. Here are a few essentials:
Analysis of weather conditions
It may sound obvious, but it's always good to remember: ensuring the right weather conditions is not only essential for safety, but also for making the most of a successful outing in pleasant conditions.
To begin with, it's a good idea to consult the national weather forecasts to understand the general trend over the country. Understanding weather conditions on a broad scale gives you a better grasp of how the weather systems that punctuate our seasons work. In this way, you'll be better able to anticipate the conditions of the coming days around you.
Secondly, if the weather forecast on a national scale suggests good conditions in your region, you can begin a more precise analysis on a local scale which will allow you to determine the essential elements:
- Weather wind direction and strength
- The cloud trend and its development
- The risk of showers
- Temperatures
- The evolution of conditions over the day
- The presence of potential thermals and their power
As well as giving you the green light (or not) to go to flight hike , this weather analysis is essential for choosing the best place to go.

Topographical analysis
You are now aware of the weather conditions in the area, and have defined a zone in which conditions seem favourable for free flight . Now it's time to make your way... literally.
To do this, you'll need topographical maps! Maps are generally available in several formats:
- Paper version: so you can slip them into your bag and always have them with you. No more connection problems or flat batteries. On the other hand, you'll need to learn how to read maps properly and find your way around routes. Overly large-scale maps can make it difficult to read the trails.
- Digital version: sites such as Geoportail.gouv for France, Maps of Switzerland for Switzerland or Geoportal.de for Germany give you access to base maps detailing hiking trails. The digital version has the advantage of being compact, easy to carry and easy to consult, since it's all in your phone. Functions such as zooming in and out, and showing your position on the map, also help you to find your way precisely while hiking. On the other hand, beware of off-grid zones, of which there can be many in the mountains. If you decide to rely on a digital map, make sure you have a plan B in case of power cuts or a flat battery!

These maps provide a wealth of information to help you prepare your Hike & Fly outing:
- Altitudes and level lines: these allow you to calculate the cumulative height difference or identify the different slopes of your outing.
- Terrain: identify potential take-off points facing into the wind, as well as leeward areas, to ensure a safe flight from take-off to landing.
- Water points: this information is particularly useful for people setting off for long periods (flight bivouac over several days or very long hike) to replenish their water supplies and avoid the risk of dehydration.
- Plan Bs and back-up options: if conditions aren't flyable at the summit, or an obstacle prevents you from continuing on your way, it can be useful to scout out an alternative trail or several take-off sites. Generally speaking, having a good overview of the terrain in which you're evolving can only be an asset!
In short, keeping track of your itinerary on a map and looking around will help you avoid getting into tricky situations. Don't forget that when you're flight hike in the mountains, you're in a technical environment where conditions change rapidly and can sometimes prove hostile if you stray off course.
Search for active or protected areas
Now that you've found an itinerary that suits your level and the day's weather conditions, you need to check the local air regulations.
Take care to consult an aeronautical chart to make sure you don't cross any prohibited or active zones. These maps are often provided by specialized sites for each country, such as the SIA site for French aeronautical information, NATS, its British equivalent, or the FSVL site for Switzerland, which lists the country's air zones.
Also, check that the flight plan (from take-off toLanding) does not cross a protected area such as a nature reserve. It's vital to respect the environment and the flora and fauna where you'll be Hike & Fly'ing.
Choose your site
In Hike & Fly, take-off is sometimes a technical moment. If you're just starting out, or if you're used to Take-off from well-equipped sites (carpet, Windstock, beacon), you may feel a little lost on your first few outings. Getting back to basics is a good exercise, but it's no reason to take risks.
Before setting off for your flight hike , use satellite images (Google Maps, Geoportail, Google Earth) to check that the proposed take-off site is suitable. Also refer to your topographic map to assess the slope's inclination. Choose grassy slopes and avoid scree slopes!

If you're starting the flight hike, the ideal is to start with a route that takes you to an official take-off, or even a take-off that you have already frequented. Indeed, walking with a glider On the back can be a very physical exercise for someone who is not used to it, so you have to keep enough energy and ability to concentrate not to do anything in the process. flight.
That's why we recommend starting with flight hike on a familiar flight site. Eliminating the unknowns inherent in flight allows you to concentrate on the novelties of the walking phase with your gear on your back.
The next level is to try the "wilder" itineraries, which are still well-travelled enough not to leave you to your own devices.
Take the example of the Col de Frêtes Hike & Fly above Annecy. This flight hike is so popular and frequented that the take-off, although wild, is equipped with a beacon in summer. It's rare not to come across anyone for the entire duration of flight hike . What's more, theLanding is on the official Perroix terrain, so it's an ideal route for continuing to progress without going completely blind.
If you are unable to Land in an official field and find yourself obliged to cowherd, you need to choose your field carefully.
Preferably, choose a grassy, uncultivated field. If this isn't possible, try to choose one that has already been mowed and where you won't damage the farmers' work. Once you've set up, leave the field quickly and by the shortest route. Of course, fold your equipment outside any private area.
Ask for Advise
If you're completely unfamiliar with the area in which you're planning your Hike & Fly outing, you can contact the nearest school and ask Advise. The instructors and professionals at flight are in the best position to give you all the information you need about the local aerology and itineraries.
Whether it's online in groups and forums or chatting to people at take-off, you'll soon realize that there are many pilots who would be delighted to share their Hike & Fly experiences and favorite routes with you. Don't hesitate to take the time to chat with more experienced paragliders.
The equipment flight
Choosing the right equipment for your level
Just as Hike & Fly is growing exponentially, specialized equipment is naturally following the same trend. Light, light, utlra-light, beginner or performance, the products in this category are constantly multiplying on the market, and you're spoilt for choice.
In this jungle of attractive products, how do you choose the one that's right for you?
Choose a course according to your level
Just as a beginner is not going to Take-off in the 14h thermals at the height of the spring season, it's out of the question to start the Hike & Fly with 2000m of positive ascent (also known as "d+") and a cliff descent in a scree slope. Start with a simple route.
Obviously, the definition of "easy" will not be the same for a seasoned trail runner or for someone who has never hiked before, but overall, an outing of 500 metres of positive ascent is a reasonable level for discovering the activity and not risking arriving exhausted at the summit. You can then adapt the difficulty of the next outing according to the level of fatigue felt during this discovery outing.
This first Hike & Fly also enables you to assess your climbing speed, which will later be very useful when choosing your route. In fact, in addition to choosing a site suited to your level (as we detailed in the "choosing a site" section), you also need to anticipate the time at which you plan to Take-off, and to do this, you need to know how long it will take you to walk to your goal.

Choose your glider
The most important thing is to choose a glider at your level with which you are sure to be comfortable. flight hike can sometimes take you over technical terrain with complex aerology, so it's essential to feel at ease under your glider so you can concentrate on steering and avoid unnecessary stress.
If you're a beginner, you may want to consider a school-leaver glider like the BIRDY2, which maintains the High level of passive safety while lightening your pack. Thanks to its EN-A+ certification and semi-light structure, this progress glider is perfect for safe beginner Hike & Fly practice.
Then, when you are a little more advanced in your progression, you will mainly have the choice between 3 types of gliders :


These gliders are not only dedicated to walking and flight and strike the perfect balance between lightness and durability, like the STEP X (EN-B+) for example.
They allow you to do everything with a single glider (Hike & Fly, soaring, flight on site, cross-country...) and are aimed at pilots who want to do everything with a single glider.
From the leading edge to the tip of the feathers, these gliders are designed to lighten your bag. They are gliders ideal for flight hike and their lightness will make you forget you have them in your bag. The LEAF3 light falls into this category.
However, this equipment must be taken care of as it is naturally more delicate than standard versions of the products. This difference in durability will not be felt in a Use Normal of your paraglider, but dragging out your glider on a particularly abrasive floor, for example, can damage a glider so-called "light" that a glider classic.
Whether gliders mountains ( EIKO2 type) or monosurfaces, these are ultra-specialized products for Hike & Fly.
These are the lightest gliders on the market, but Caution, they are generally less suited to flight thermal and are therefore a little less versatile than the gliders presented above.
Also, gliders monosurfaces tend not to have much speed, which can sometimes be a handicap in mountainous, often windier environments.
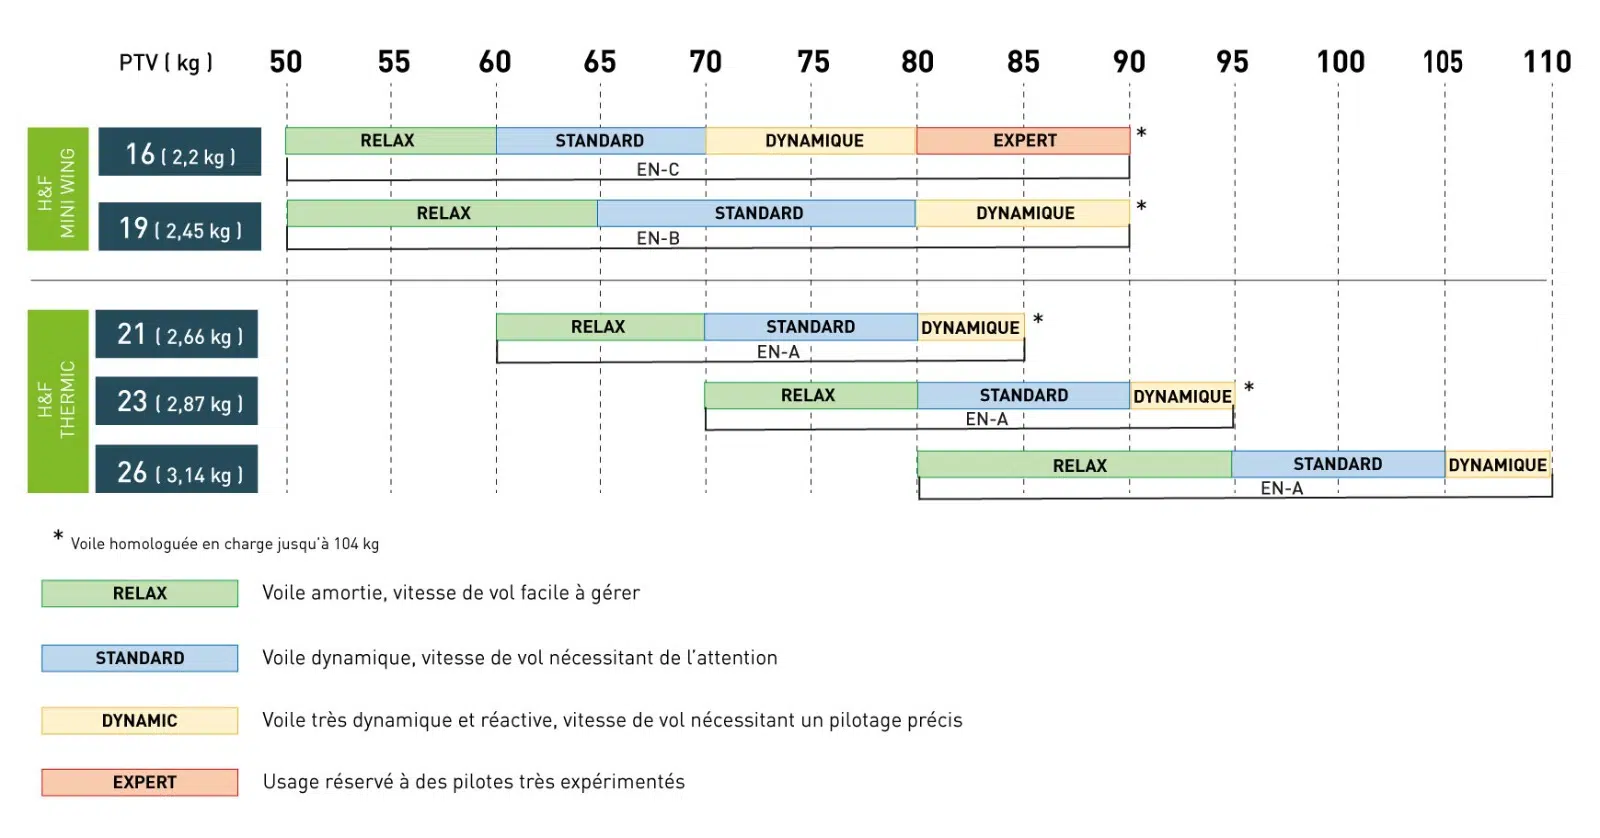
CautionThe approvals of some gliders mountain models, such as the EIKO2, may vary according to the wing loading. The heavier you load your glider, the faster and more dynamicglider will be. The less you load it, the more forgiving and supple it will be. Caution Be sure to read the manufacturer's Flying weight range range recommendations when selecting the size of your glider so as not to be surprised!
Below you can see the size chart of the EIKO2 as well as the behavior of theglider depending on the weight of the rider.
Choose your harness
As far as harnesses is concerned, we've already covered the subject in a previous article. You can find all our tips for choosing your harness by clicking on the button below.
Finally, whatever your level, if you have the slightest doubt about your choice of equipment, don't hesitate to contact your local store or your instructor. They will be in the best position to guide you towards the best choice and the product that best suits your flying style and Airfoil .
Example
You'd like to do a morning flight hike and Take-off in calm conditions. You choose an east face take-off with 750 m of d+ and climb at an average rate of 500 m of d+ per hour. In theory, you'll need to walk 1h30 to reach the take-off point. As this is an east face, you'll need to Take-off early to avoid crossing any thermals. If you're aiming for take-off around 9:30 am, you'll need to leave no later than 8 am.
Prepare the rest of your equipment
Now that you've chosen your itinerary and site flight, all that's left to do is pack your gear. In addition to your glider, your harness and your first aid kit, here's a sample list of useful equipment for flight hike :
Packing list for flight hike
It's in-dis-pen-sable. Regardless of the length of your walk, walk with a glider On your back is an effort for the body and you have to stay well hydrated. Remember, if you're thirsty, you're already in the first stage of dehydration! Don't wait until you get that feeling to drink.
Whether on flight or on the trails, you'll come across sometimes tortuous terrain, and good footwear is essential to avoid hurting yourself. Choose shoes that support the foot properly. The sole should have small studs, which will come in handy in muddy or slippery terrain.
It's important to protect your eyes, so don't forget your sunglasses!
If you're flying with a mask, make a note of it on your list so you don't forget. Don't forget to take a pair of goggles for use during the hike.
Walking poles are very useful for distributing effort between your legs and arms. What's more, they help you keep your balance and provide support on winding trails.
CautionBefore setting off flight hike with your poles, make sure they fit into the back pocket of your harness. It would be a shame not to be able to descend with them...
Sun protection is essential, especially in the hot season when sunstroke and sunburn happen faster than you can say. Take your sunscreen with you, so you can reapply it as you go.
As for walking:
When choosing what to wear, remember to check the weather forecast at hike... and also at the take-off site! Remember that the temperature drops by around 0.65°C for every 100m of altitude. A 1000 m ascent of d+ can therefore cause you to lose 6.5°C! (if there are no inversions or other aerological phenomena affecting temperature variation). So bringing a little wool with you isn't an heresy if you're going to be climbing long distances, even in midsummer.
To correctly choose your Hike & Fly outfit, you can refer to the advice given to hikers:
Your first layer should be made of a breathable fabric that doesn't retain moisture. Avoid cotton and opt for technical fabrics that dry quickly.
Depending on the season, bring along a layer to protect you from the cold: fleece or down jacket, the choice depends on the temperature and your preferences.
Hikers are accustomed to wearing a third layer to protect themselves from the wind or rain. But let's be honest, if showers are forecast or the wind is blowing so hard that you need a windbreaker, you'd be better off staying at home rather than heading off to flight hike !
Finally, remember to bring a change of clothes. If you've sweated on the way up, you can quickly catch a cold at flight if your underlay is still damp.
As for flight :
Depending on the length of your itinerary, it's a good idea to pack a small snack to give you a boost: cereal bar, fruit paste, compote, dried fruit, sandwich... Choose foods that won't be crushed or ground into crumbs in your bag.
We strongly recommend that you do not try to save weight at the expense of safety. Especially since helmets today can be so light. The Helmet PILOT weighs just 380 g... It would be a shame to go without!
In cross-country, inflation or Hike & Fly, the rule is the same: having gloves allows you to quickly catch a line without risking getting burned, it's a guarantee of safety. It's important to be able to lower your glider at any time by gripping the brake line, for example. Adjust the thickness of your gloves according to the season, but make sure you don't Caution so that your winter gloves can still fit in the Handle brake.
Despite the extra weight, rescue parachute remains a very important safety feature.
Indeed, when you're on a Hike & Fly, you're likely to come into contact with unfamiliar sites and aerologies.
To avoid unpleasant surprises, don't hesitate to equip yourself with a lightweight rescue parachute .
For your comfort flight, don't hesitate to bring any other accessory from flight that you find useful: radio if you're flying with several people, Variometer, etc.
Thespeed bar is a safety device that we recommend you carry with you at all times. It can be very useful in the event of a strengthening wind or an unfortunate passage through a venturi.
A few thoughts and a small bottle of disinfectant don't take up much space, so it'd be a shame to go without. All the more so as, when hiking, a little boo-boo can happen very quickly.
All you have to do is store all the above items in your rucksak, with your Hike-and-Fly glider and harness.
When loading your bag, make sure you load the equipment you'll be using on the trail so that you can access it without having to unpack everything.
Before you leave, make sure that all the equipment you bring in your rucksak also fits in the Pockets of Storage of your harness so as not to get stuck in High.

Once en route to your flight hike
Keeping an eye on the weather
Even if all the lights were green during your last weather analysis, conditions can change throughout the day, and even very quickly in the mountains. During your hike, always keep an eye on the evolution of the sky and be attentive to any wind you may feel.
Even if the weather remains fine, observing the conditions throughout your ascent will make it easier to grasp the aerology you'll encounter on takeoff and during your flight.
Respecting the environment
When you're out in nature, show discipline and respect for the flora and fauna. Avoid going off the beaten track, don't be too noisy and don't leave any garbage or objects behind. The fewer traces you leave, the better.
If flight hike enables us to fly in wild places to the delight of our eyes, it is our responsibility to safeguard this fragile environment.
Knowing when to give up
It may happen that during your climb, or once you've reached take-off, conditions are not what you expected. Perhaps the weather has deteriorated faster than expected, or you've missed something during your analysis... Whatever, the facts are there: the safety of your flight is not guaranteed.
As the saying goes: "If there's a doubt, there's no doubt"!
Descending on foot can be really frustrating, but knowing how to give up is the most important quality of a Hike & Fly rider.
Always anticipate the risk of having to walk back down, whether to make sure you have enough energy left for a potential descent on foot, or to make sure you have enough time before dark to get back to your starting point.
If you practice in a group, be sure to Caution the influence the other pilots may have on you. If you think the conditions are above your level but all your friends seem to want to go, there's no shame in giving up. Forcing yourself to fly just because you don't want to look like "the chicken" is a very bad reason to put yourself in flight.
Remember: not everyone sets their limits at the same level, and respecting yours is essential to staying safe and having fun.
You can be sure of this: flight hike is not worth the effort danger.
Enjoy!
Here's our final Advise : make the most of every moment!
To be immersed in the heart of nature and to walk along trails that open onto breathtaking scenery is an extraordinary opportunity that our sport offers us.
All you have to do is savor these special moments with Mother Nature.
5. Want to go further?
If you're already a regular at flight hike and want to go one step further, then gliders is the place for you.
Perhaps it's time to tackle the next level: flight bivouac. This subject is so vast that it's easy to ask "But where do I start?".
Our answer to this question can be summed up in 2 words: FLY TOPO!
This video series is designed to help you discover easy, accessible itineraries that will allow you to embark on your flight bivouac adventure with complete peace of mind.
The FLY TOPO series is regularly updated with new route suggestions. Find all the routes already available on our digital notebook :


